The Wiki for Tale 6 is in read-only mode and is available for archival and reference purposes only. Please visit the current Tale 11 Wiki in the meantime.
If you have any issues with this Wiki, please post in #wiki-editing on Discord or contact Brad in-game.
User:Rey/Pyro
I was asked to explain how I designed the firework 'Roses are red, this one is blue'. I'm no pyro expert by any means and I'm grateful to others who have provided advice and help on the wiki through the Tales. I'll try to explain as best I can, if you still have questions feel free to message me. I'm not bothered about decimal places and such, this is just for illustration purposes.
My idea was to design something that at least faintly resembled a rose and with a few tweaks I think that I got there. Although, there is always room for improvement. The main limit of course is the number of edit slots(12) on the mortar, so I had to improvise a little bit.
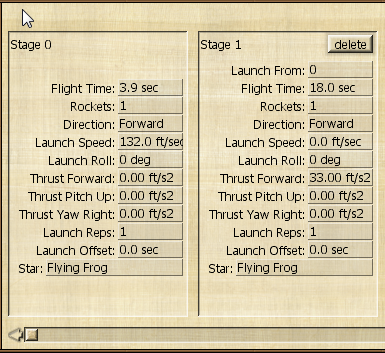
Stage 0 and Stage 1
This is just a basic hovering platform with the flying frog star in stage 1 hovering for 18 seconds. This time is quite central to the firework as it determines the majority of the flight time it will run. It also affects the frequecy of the repetitions of child rockets. This will become evident at later stages.
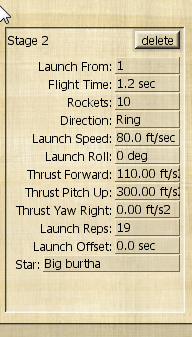
Stage 2
This is the centre 'bud' of the flower. A Ring formation with high pitch up and tweaking the flight time, in this case 1.2 seconds, to ensure they meet at a point, not before or after. You will notice the reps are set at 19, this means that for every second that the hovering star in stage 1 (parent rocket) is hovering, the child rocket fires. I could have it at 18 reps which would match the 18 seconds exactly but I had some extras and used it up adding another rep. This is the key to the whole firework really, the ratio of the flight time of the parent rocket to the amount of repetitions of the child rocket. At 18 seconds for the parent rocket/ 18 reps of child rocket = one rep every second. Thus, 18 secs of parent/ 36 reps of child = one rep every 0.5 seconds or 18 secs of parent/ 9 reps of child = one rep every 2 seconds. This is how we get the effect of a continuous line. It works best with stars that have long tails because the tail will be connected to the head of the next firing rocket, creating a linear illusion. It can also be used quite nicely with shorter stars to create a machine-gun effect.
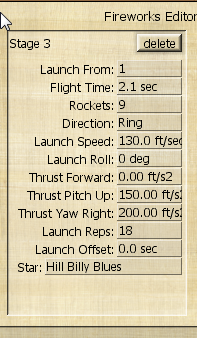
Stage 3
These are the petals. Quite simply a long-tailed star with a pleasant colour (Hillbilly Blues). You could set however many rockets you wanted, I just thought it looked evenly spaced at 9 rockets. I set the angles and flight times so that each rocket would stop as it collided with the neigbours flight path.
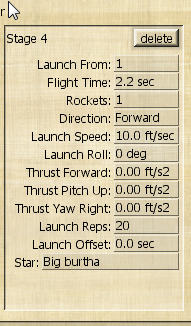
Stage 4 and Stage 7
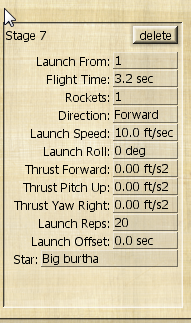
This is the stalk of the rose. I needed to have 2 places along the stalk from where I could fire rockets to form the leaves and also the base. To do this I set up 2 stages, also firing from the stage 1 hovering rocket. As you can see, one rocket has a 2.2 second flight time (for leaves) and the other a 3.2 second flight time (for the base). These will link up with stages 5,6 and 8 respectively. I will explain more when we get there.
Stage 5 and Stage 6
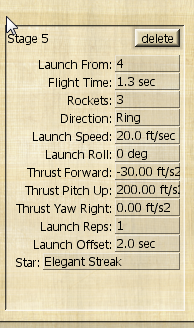
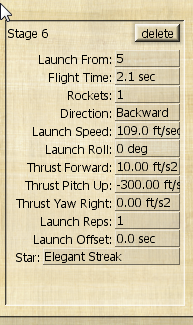
These are the leaves. Stage 5 is now launched from stage 4, as I said above with a short flight time and a ring direction and 3 rockets, which results in 3 leaves. Stage 6 is launched from stage 5 but in a backward direction and longer flight time to make a second but fuller loop. So, if you can imagine it: stage 4 launches from 2(the hovering rocket) towards the ground, after 2.2 seconds stage 5 launches from stage 4 into a small loop, after 1.3 seconds stage 6 launches from stage 5 into a loop for 2.1 seconds.
