The Wiki for Tale 6 is in read-only mode and is available for archival and reference purposes only. Please visit the current Tale 11 Wiki in the meantime.
If you have any issues with this Wiki, please post in #wiki-editing on Discord or contact Brad in-game.
User:Daniels\AlloyGuide
New: Video Guide
This guide is meant to be a supplement to the other guides on Alloy. The reason I wrote this guide was to share my methods with players who are new to making alloys. While the other guides are great for explaining theories, and showing off some advanced techniques, this guide will attempt to give you a base method with which you can begin learning how to do alloys well. It is essential that you understand the following themes that I will be teaching in this guide:
1. Don't be greedy. Know when to give up on an outer circle.
2. Overlapping circles can be clicked, but it isn't a good idea generally until you get an idea of how far overlapping crystals will travel. Click on a non-overlapping section of a crystal to begin with.
3. A followup to the above theme number 2 to keep in mind: if the any other crystal overlaps too much, then the batch will crystallize (see Alloys Yes and No, point 2 and 7). Learn how close crystals can overlap and not cause crystallization if one of them is clicked.
4. For best practices, click on a circle that overlaps the most dense group of circles. This circle should also be the closest to the most dense group of circles (but not too close! see Alloys Yes and No, point 2 and 7). By doing this you will be "collecting" circles into one big mass, hopefully without crystallizing them. After you "collect" as many crystals as possible, you click the center of the mass to crystallize the batch. We will be focusing on this method in this guide.
5. Two of the most important theories of alloys tend to get overlooked:
- The further away a dense mass of crystals have to travel, the more spread apart they will become.
- A very tightly non-crystallized group of crystals is the exception to this. They will move together over one single outer crystal as that outer crystal is clicked (as long as the tight group of crystals is touching the outer crystal). This is how 100%'s are born.
6. Accept the fact that not all alloy layouts are possible to work with. Even the best alloy makers get a lot of failures, or yields that are not worth taking.
7. Practice makes perfect. A lot of practice may even make perfect crystallization.
8. Over time you will learn just how close a crystal can be to other crystals without crystallizing the batch. Knowing this takes practice. Refer to Alloys Yes and No for a general understanding of where not to click. This guide should be better at explaining where to click.
9. Don't give in to small yields, but don't expect 100%'s every time either. I generally take anything above 50% on alloys, but I do a lot of mining. Reheat, reheat, reheat!
10. New: Don't forget that you can click in the middle of the active circle. You don't have to click where the red dots indicate in the screenshots in this guide. In fact, I encourage you to click in the center of the circle that you want to be active! This makes alloy making much easier!
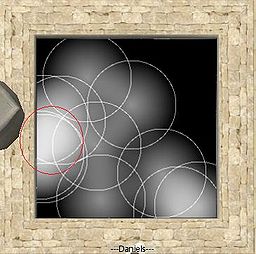
Now, let's put these themes and theories to practice. We begin with an okish layout of circles:
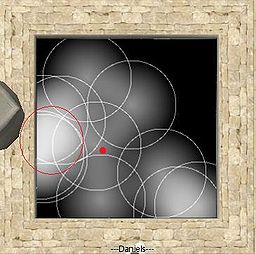
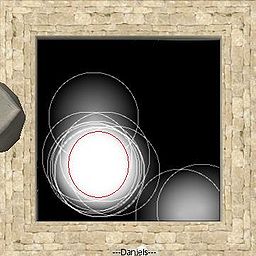
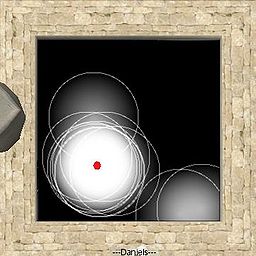
In the picture above, we've identified the most dense group of circles, and placed a red circle around this most dense area. This should be the focal point for any given layout of circles. Using this focal point, we use theme number 4 above, and find the closest circle to this area that is also far enough to click on. The next picture shows this point for this particular layout:
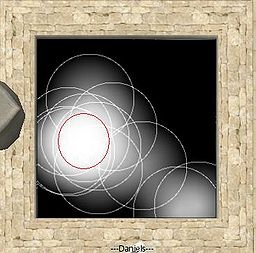
After clicking this point, we get this:
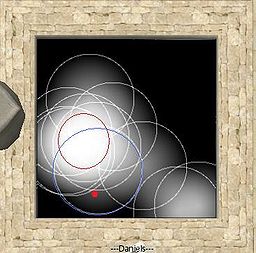
In the above picture, we've circled our focus in red. You hopefully notice that there are several spots to click on for the next move. Again, we apply theme 4 from above, and find the closest circle to overlap the focal point. This circle is shown below, along with the point that is clicked on that circle:
In the above picture, the circle that becomes active (the one that is clicked on) is highlighted in blue. This clearly shows that this particular circle overlaps the center of the bright area more so than the other circles, but it also has enough distance away not to crystalize the batch. Get into the habit of identifying both the "brightest", most dense area, and the circle that overlaps this area the most while still having enough distance away to click on.
After the click on this circle we have this:
Looking at the picture above, the question we ask ourselves is this: do we continue trying to collect the crystal above the mass, or do we crystalize? This is where theme number 1 comes in. While our mass is fairly dense and collected on top of each other, it may not be dense enough to collect the top circle. It is also just a little too far away from the mass. We can just forget about the other two circles in the lower right corner of the reactory, there is no chance with them. If we tried to click on any of these circles, our nicely dense, non-crystallized mass would probably start to separate, and we will lose our progress. Instead, we click the final spot to crystallize the batch:
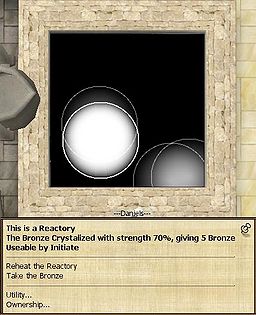
So, was it worth it to not try for that other crystal? Here is the outcome of our crystallization:
Hopefully this technique will help you understand alloys a little better. It is by far not the only technique to making alloy, but it is probably the simplest to get started with. Remember that this guide is meant to be a supplement to the other good information on this wiki. Be sure to read these as well:
- Please leave me a chat in game and let me know if this guide has helped you or not. Any suggestions are welcome. :)
