The Wiki for Tale 6 is in read-only mode and is available for archival and reference purposes only. Please visit the current Tale 11 Wiki in the meantime.
If you have any issues with this Wiki, please post in #wiki-editing on Discord or contact Brad in-game.
User:Obol/PyroGuide
Introduction
I will try to illustrate some of the basics of designing a fire works mortar. There are already some good guilds you should check out. Test of Pyrotechnics gives you general information about the test and Pyrotechnics Guides does a great job of explaining the interface. However I will try to explain some of the more non-intuitive aspects of designing fireworks.
Preparation
First off I suggest you make a large amount of gunpowder and get as many stars made as you can. Gunpowder will require a large amount of dung so build several camel pens and keep them well fed. Stars can get expensive with all the metal salts and other ingredients but I suggest you make many of each type, especially if you want to use more then 1 Rocket and Launch Reps options. While designing the mortar all ways use the Test Fire option, this will not consume the resources loaded into the mortar so you can test fire it often, but you will need the resources in your pocket. To avoid confusion, I am talking about the Test Fire button in the design interface, not the test fire option on the menu. To use the test fire on the menu you will need to arm it first, the button in the interface will arm it for you, plus it will give you a list of ingredients needed if you don't have them in your pocket.
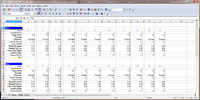
Below is an example of my Designs Notes spreadsheet, click on the image to get a better view. Notice the formatting of the cells to match the numbers used in the mortar design screen. It is wise to keep design notes in case you tweak it and you want to go back to what you had.
Lessons
LESSON 1:
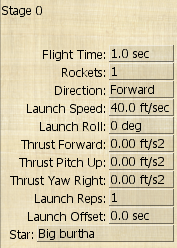
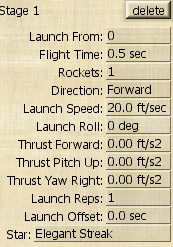
Notice the design images next to the text for the Stars and settings I used for each example. Follow along with me in Edit Design mode of the mortar and test fire each one to see the results. Some of the attributes in the settings work together in concert with each other to effect how the stars flight reacts. The following lessons will demonstrate some of these connections.
REQUIREMENTS: Make a mortar and have 1 Papyrus Paper, 2 gunpowder and 2 stars in your pocket.
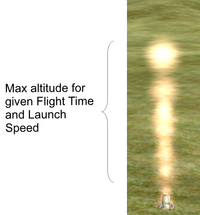
| STEP 1: Referring to the images on the right, notice that with a Flight Time of 1 second and a Launch Speed of 40, the star will travel to a given altitude and vanish. But what does that mean? The underlying meaning to this is the next stage will continue where the previous stage ended. Let's try something to show the connection between Flight Time and Launch Speed. HOME WORK 1: Change the Flight Time to 2 sec. and test fire, notice the star reaches the same altitude but then heads back downwards. This means that the Launch Speed was not enough gunpowder to meet the Flight Time. HOME WORK 2: Change the Flight Time to 1.2 secs and test fire, notice the star reaches the altitude and hovers for a split second, but which direction is it headed now?. We will better illustrate this in the next STEP. |
||
| STEP 2: Change Stage 0 settings to STEP 1/Design 1, add a stage to the mortar and use the settings from the image Design 2 for Stage 1 and test fire. You should get about the same results as image Launch 2. Also notice that the settings for Stage 1 are less then the settings for Stage 0, that is because there was still some thrust left over from Stage 0 that carried over to Stage 1. However, this lesson is meant to illustrate how to effect the following stage using the previous stage. We will illustrate that in your home work. HOME WORK 1: Again, change the Flight Time of Stage 0 to 2 secs. and test fire. Notice that since Stage 0 was heading downwards Stage 1 fired downwards. HOME WORK 2: Change the Flight Time of Stage 0 to 1.2 secs. Notice that even though it looked like Stage 0 hovered, it was still heading down when Stage 1 fired. HOME WORK 3: Tweak the Flight Time of Stage 0 till Stage 1 fires upwards. NOTICE: 1.1 works and does not leave Stage 1 any extra thrust, however, 0.5 does. I can tell by how far Stage 1 travels. This may seem like a mundane concept but it is very important to grasp while adding more and more stages to the mortar. |
LESSON 2:
In this lesson we will jump into something a little more complex. We will cover some of the Direction options and Trust options as well as Roll and Reps. You can play around with the Ring and Fan direction options, they are fairly intuitive, just add an even or odd number of Rockets. Keep in mind that if you follow a Ring/Fan stage, say with 4 Rockets, the following stage will require 4X the number of rockets for each consecutive stage. However, I am usually disappointed with them.
REQUIREMENTS: Use the previous mortar and have ? gunpowder and ? stars in your pocket.
NOTE:Since I can only capture a small part of the fireworks, the following images will only show the last part.
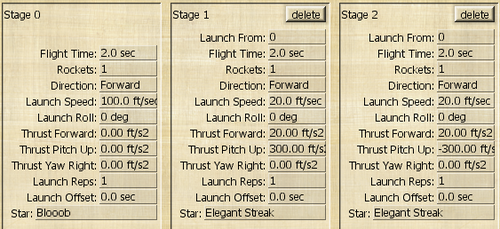
| STEP 1: Typically Stage 0 is only used to gain altitude to start the main fireworks show. Add 2 stages to the mortar and use the settings from the Design 3 image. Once Test Fired yous should get an ending result of something like Launch 3 image. Notice Stage 1 & 2 both start from Launch 0 so they both start from the end of stage 0. Also notice the Thrust Yaw Right settings for Stages 1 & 2. Stage 1 is positive so it goes to the right but Stage 2 is negative so it goes to the left. NOTICE: You have to look at this design by viewing from either South or North. HOME WORK 1: Change the Launch Roll setting of Stage 0 to 90 |
TO BE CONTINUED
