The Wiki for Tale 6 is in read-only mode and is available for archival and reference purposes only. Please visit the current Tale 11 Wiki in the meantime.
If you have any issues with this Wiki, please post in #wiki-editing on Discord or contact Brad in-game.
User:Cegaiel/Macros/CarpBlade
Carpentry Blade 1680x1050 (Autohotkey)
CREDIT: Full credit for the actual carp blade making portion goes to Oni's Carpentry Blade Macro 1680x1050 script, based off his ACTools macro. I simply converted it to Autohotkey and added some very useful features/hotkeys for more ease and flexiblity.
Last Update:
- 9/26/2010: Fixed code, now produces 7.1k quality blades instead of 6.5k quality (Thanks Taketu on helping me discover that error).
- 10/09/2010:
- Very minor adjustment on load anvil coords to be more laptop friendly.
- Changed the NumPad + key to the "N" key on keyboard to engage Non Stop mode (Again, laptop friendly)
- Added several error checks; will not allow non stop mode with blank qty or qty of 1. Must be 2 or more
- Added more info in some of the popup boxes to be more clearer about what to do next, once Non stop mode is engaged.
- New menu that asks if you have Advanced Blacksmithing 1 or 2. The reason for this, is that you have more projects that become available once you acquire Adv BS 2. This will adjust the locations accordingly and click the carp blade project correctly.
- 12/10/2010:
- Changed click positions to work on guilded or public anvils. Previously would only work on private anvils. Note to use on private anvils, you will need to temporarily change to public.
- Make 7.1k - 7.2k carpentry blades in about 10 seconds (Single keyboard click to repeat previously sucessful blades).
- Works only in 1680x1050 screen resolution
- Asks if you're using Copper or Iron metal
- Double F8 View zoom all the way in (script will do this automatically for you, so ignore this).
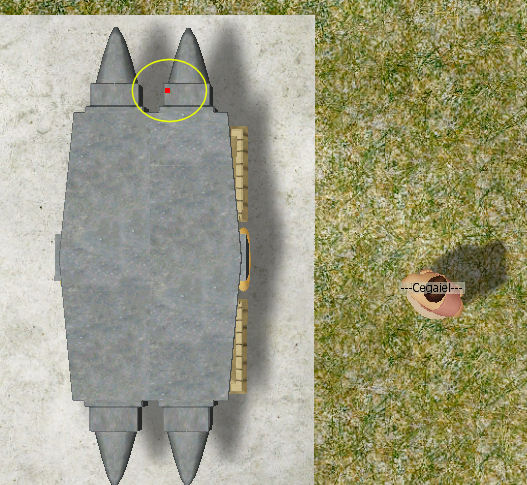
- Place mouse on starting position (while hovering red dot, bottom image).
- Press F2 to start making a blade (or Right Ctrl to make blade from a previously successful location - no need to move mouse with this option, position is irrelevent since it uses coords from memory)
Hotkeys (That works after script is started, but while idle):
- Note the script runs in continuous loop - Always running, waiting for you to press a hotkey, even if its not clicking...
- F1 Help Screen
- F2 Make a blade and store coordinates into script memory AND clipboard
- Note: The only purpose of putting into clipboard is in case you're about to log out of the game. Next time you log on (assuming you didn't move your avatar, you can just click the same coords you were using your previous session (this is where Left Shift comes into play). You can paste your last coords with Ctrl+V into notepad at anytime for later reference. If your avatar moves even a half of a step, then those coords will not be valid anymore.
- Right Alt: Make another blade from last F2 coordinates (memory)
- <Hold> Left Shift: Show current mouse position
- Right Shift: Show last F2 coordinates (memory)
- "N" key (on keyboard): Enable/Disable Non Stop mode (New feature added: 9/25/2010)
Non Stop Mode: Once you get a 7.1k quality blade, then hit "N" key, on keyboard, to enable non stop mode.
Then accept the current project with Left Alt and it will continue nonstop, creating/accepting blades.
There is a 2 second pause after the quality is shown on screen for you to pause script (Ctrl+P). Do that when you have used your last metal. If you do not enable non stop mode, then it will make one blade at a time (with the hotkeys for each step).
Hotkeys you use after making a blade:
- Left Alt: Approve and unload a blade into your inventory (Automatically clicks Complete Project on menu).
- SPACEBAR: Discard project and recover metal (Automatically clicks Discard on menu)
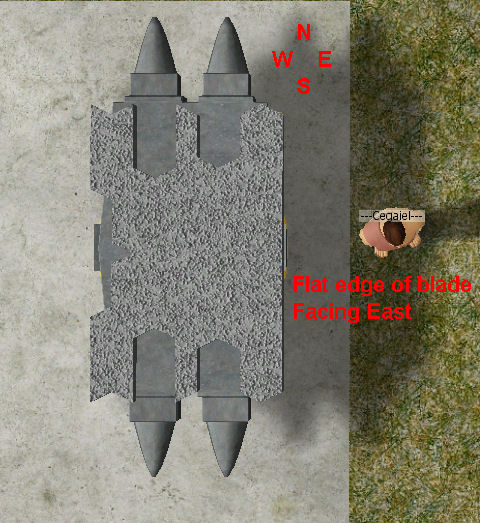
Your Anvil MUST be aligned North to South. When loaded, the cutting edge of the blade must face East.
Why: When you Double F8, the screen automatically changes to have North at top of screen, South at bottom of screen.
By default (I believe) when you build an Anvil in your compound, it will automatically be in the correct position. If should be facing North to South and the flat edge part will be on the east (right). If you build your anvil as is (don't rotate) then it should be in the correct position (I believe). There are no markings, on anvil, to confirm which way the blade will face until you build it and actually load a piece of metal into it.
Starting Position (hover mouse here) to begin macro (F2 key) at:
- Yes, I do find it to be better to be standing on right side, around where I am.
- If you stand on left side, there will be a shadow (black vertical strip) around the starting position which makes it more difficult to pinpoint.
- You basically want to hover at the exact edge of the left side of starting point.
- And about 2 coordinates south of the top edge.
- MAKE SURE CHAT IS MINIMIZED (As the script sends hotkeys which will appear in chat if unminimized)
- YOU MUST USE THIS ON PUBLIC OR GUILDED ANVILS!!! Otherwise it will misclick when it loads or unloads the metal. For private anvils, temporarily set to Public.
Or Click here for:
Screenshot of staring position on Oni's T5 Macro page

