The Wiki for Tale 4 is in read-only mode and is available for archival and reference purposes only. Please visit the current Tale 11 Wiki in the meantime.
If you have any issues with this Wiki, please post in #wiki-editing on Discord or contact Brad in-game.
Difference between revisions of "Reactory"
| (27 intermediate revisions by 13 users not shown) | |||
| Line 1: | Line 1: | ||
| − | + | {{Template:BuildingInfo|image=Reactory.png|size=17x17|where=[[where::Compound]]|description=A furnace used to create alloys.}} | |
| + | == Source == | ||
| + | This building becomes available after you have learned the [[Advanced Metallurgy]] tech. | ||
| − | + | Also, [[Advanced Metallurgy]] or higher must be learned to operate an already constructed Reactory. Higher levels of Advanced Metallurgy allow increasingly more alloy types that can be crafted. | |
| − | |||
| − | + | == Cost == | |
| + | * 12 [[requires::Cut Stone]] | ||
| + | * 1 [[requires::Iron Pot]] | ||
| + | * 20 [[requires::Leather]] | ||
| + | * 240 [[requires::Firebricks]] | ||
| + | * 10 [[requires::Small Topaz]] | ||
| + | Built in a [[Compound]]. Uses 17x17 cells. | ||
| − | + | == Hopper Upgrades == | |
| − | + | Once a reactory is built, it may be upgraded to allow larger batches. This requires [[Structure Reinforcement 2]] (Level required to learn: 18) to install the upgrade, but not to use it. Upgrades must be installed in order, e.g. you must install the 2x upgrade before you can install the 4x upgrade. | |
| − | + | An upgraded reactory allows you to choose the batch size to use when starting a new alloy. The initial charcoal, resin, metal costs, and final alloy yield are multiplied by the batch size (note: due to rounding, the yield may not be exactly scaled - see individual alloy pages for details). | |
| − | + | The cost to reheat a large batch does ''not'' increase. It always costs 3 charcoal and 1 resin to reheat, regardless of batch size. This means that reheats are effectively cheaper for larger batches. | |
| − | |||
| − | |||
| − | |||
| − | |||
| − | |||
| − | |||
| − | |||
| − | == | + | === 2x Hopper Upgrade Cost === |
| − | *[[ | + | * 60 [[requires::Steel Sheeting]] |
| − | == | + | === 4x Hopper Upgrade Cost === |
| − | See [[ | + | * 150 [[requires::Treated Metal Sheeting|Titanium Metal Sheeting: Hard Stainless]] |
| − | + | * 2 [[requires::Crucibles]] | |
| + | * 10 [[requires::Iron Strap]] | ||
| + | * 500 [[requires::Clay Bricks]] | ||
| + | * 100 [[requires::Raeli Tiles|Black Raeli Tiles]] | ||
| + | * 1 [[requires::Thermometer]] | ||
| + | |||
| + | === 7x Hopper Upgrade Cost === | ||
| + | * 100 [[requires::Treated Metal Sheeting|Sun Steel Metal Sheeting: Hard Stainless Insulative]] | ||
| + | * 10 [[requires::Crucibles]] | ||
| + | * 10 [[requires::Aluminum Strap]] | ||
| + | * 500 [[requires::Clay Bricks]] | ||
| + | * 500 [[requires::Firebricks]] | ||
| + | * 200 [[requires::Concrete]] | ||
| + | * 250 [[requires::Raeli Tiles|Black Raeli Tiles]] | ||
| + | * 1 [[requires::Thermometer]] | ||
| + | |||
| + | == Use == | ||
| + | To produce a normal-sized batch of an alloy requires an alloy-specific combination of metals and [[Resin]], and 5 [[fuel::Charcoal]] to fuel the Reactory. Larger batch sizes in an upgraded reactory scale the required inputs according to the batch size. | ||
| + | |||
| + | An alloy must be "crystallized" by working the reactory, observing a number of rings and clicking in specific places. The yield of the reactory depends on how well this is done. See the [[Alloys]] page for more details and current theories. | ||
| + | |||
| + | After an alloy has crystallized, you have the option of either accepting the yield and taking the alloy, or reheating the batch. Reheating the batch costs 1 [[Resin]] and 3 [[Charcoal]], and allows you to try to crystallize the alloy again for a better yield. You can repeatedly reheat a batch as many times as you like before finally taking the alloy. '''Note that [[Octec's Alloy]] cannot be reheated!''' | ||
| + | |||
| + | {| border="1" cellspacing="0" cellpadding="5" | ||
| + | ! Alloy !! Needed metals<br>(for 1x batch) !! Resin type | ||
| + | |- | ||
| + | | colspan="3" align="center" | Advanced Metallurgy 1 | ||
| + | |- | ||
| + | | [[produces::Brass]] || 7 [[Copper]], 1 [[Tin]] || [[Resin]]:[[Stout Palm]] | ||
| + | |- | ||
| + | | [[produces::Bronze]] || 7 [[Copper]], 1 [[Zinc]] || [[Resin]]:[[Fern Palm]] | ||
| + | |- | ||
| + | | [[produces::Pewter]] || 7 [[Iron]], 4 [[Antimony]], 1 [[Brass]] || [[Resin]]:[[Royal Palm]] | ||
| + | |- | ||
| + | | [[produces::Steel]] || 7 [[Iron]], 1 [[Tin]] || [[Resin]]:[[Towering Palm]] | ||
| + | |- | ||
| + | | colspan="3" align="center" | Advanced Metallurgy 2 | ||
| + | |- | ||
| + | | [[produces::Moon Steel]] || 7 [[Steel]], 3 [[Brass]], 3 [[Pewter]] || [[Resin]]:[[Hawthorn]] | ||
| + | |- | ||
| + | | [[produces::Sun Steel]] || 7 [[Steel]], 3 [[Brass]], 3 [[Bronze]] || [[Resin]]:[[Umbrella Palm]] | ||
| + | |- | ||
| + | | colspan="3" align="center" | Advanced Metallurgy 3 | ||
| + | |- | ||
| + | | [[produces::Thoth's Metal]] || 7 [[Steel]], 4 [[Moon Steel]], 4 [[Sun Steel]] || [[Resin]]:[[Folded Birch]] | ||
| + | |- | ||
| + | | [[produces::Water Metal]] || 7 [[Steel]], 4 [[Moon Steel]], 3 [[Silver]] || [[Resin]]:[[Pratyeka Tree]] | ||
| + | |- | ||
| + | | colspan="3" align="center" | Advanced Metallurgy 4 | ||
| + | |- | ||
| + | | [[produces::Metal Blue]] || 7 [[Steel]], 5 [[Thoth's Metal]], 5 [[Water Metal]], 4 [[Tungsten]] || [[Resin]]:[[Cerulean Blue]] | ||
| + | |- | ||
| + | | colspan="3" align="center" | Advanced Metallurgy 5 | ||
| + | |- | ||
| + | | [[Produces::Octec's Alloy]] || 7 [[Steel]], 5 [[Thoth's Metal]], 5 [[Water Metal]], 4 [[Tungsten]] || [[Resin]]:[[Oil Palm]] | ||
| + | |} | ||
| + | |||
| + | ==Upgraded Rings== | ||
| + | [[Image:NewReactory.jpg|thumb|300px|left|Upgraded "rings" on Reactory.]] | ||
| + | |||
| + | [[Category:Buildings]] | ||
Latest revision as of 02:29, 20 December 2009
Source
This building becomes available after you have learned the Advanced Metallurgy tech.
Also, Advanced Metallurgy or higher must be learned to operate an already constructed Reactory. Higher levels of Advanced Metallurgy allow increasingly more alloy types that can be crafted.
Cost
- 12 Cut Stone
- 1 Iron Pot
- 20 Leather
- 240 Firebricks
- 10 Small Topaz
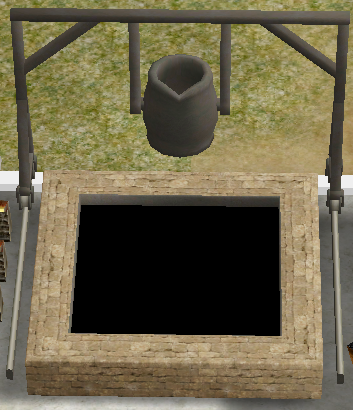
Built in a Compound. Uses 17x17 cells.
Hopper Upgrades
Once a reactory is built, it may be upgraded to allow larger batches. This requires Structure Reinforcement 2 (Level required to learn: 18) to install the upgrade, but not to use it. Upgrades must be installed in order, e.g. you must install the 2x upgrade before you can install the 4x upgrade.
An upgraded reactory allows you to choose the batch size to use when starting a new alloy. The initial charcoal, resin, metal costs, and final alloy yield are multiplied by the batch size (note: due to rounding, the yield may not be exactly scaled - see individual alloy pages for details).
The cost to reheat a large batch does not increase. It always costs 3 charcoal and 1 resin to reheat, regardless of batch size. This means that reheats are effectively cheaper for larger batches.
2x Hopper Upgrade Cost
4x Hopper Upgrade Cost
- 150 Titanium Metal Sheeting: Hard Stainless
- 2 Crucibles
- 10 Iron Strap
- 500 Clay Bricks
- 100 Black Raeli Tiles
- 1 Thermometer
7x Hopper Upgrade Cost
- 100 Sun Steel Metal Sheeting: Hard Stainless Insulative
- 10 Crucibles
- 10 Aluminum Strap
- 500 Clay Bricks
- 500 Firebricks
- 200 Concrete
- 250 Black Raeli Tiles
- 1 Thermometer
Use
To produce a normal-sized batch of an alloy requires an alloy-specific combination of metals and Resin, and 5 Charcoal to fuel the Reactory. Larger batch sizes in an upgraded reactory scale the required inputs according to the batch size.
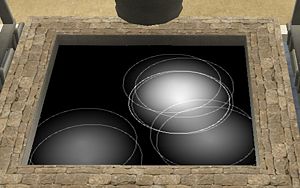
An alloy must be "crystallized" by working the reactory, observing a number of rings and clicking in specific places. The yield of the reactory depends on how well this is done. See the Alloys page for more details and current theories.
After an alloy has crystallized, you have the option of either accepting the yield and taking the alloy, or reheating the batch. Reheating the batch costs 1 Resin and 3 Charcoal, and allows you to try to crystallize the alloy again for a better yield. You can repeatedly reheat a batch as many times as you like before finally taking the alloy. Note that Octec's Alloy cannot be reheated!
| Alloy | Needed metals (for 1x batch) |
Resin type |
|---|---|---|
| Advanced Metallurgy 1 | ||
| Brass | 7 Copper, 1 Tin | Resin:Stout Palm |
| Bronze | 7 Copper, 1 Zinc | Resin:Fern Palm |
| Pewter | 7 Iron, 4 Antimony, 1 Brass | Resin:Royal Palm |
| Steel | 7 Iron, 1 Tin | Resin:Towering Palm |
| Advanced Metallurgy 2 | ||
| Moon Steel | 7 Steel, 3 Brass, 3 Pewter | Resin:Hawthorn |
| Sun Steel | 7 Steel, 3 Brass, 3 Bronze | Resin:Umbrella Palm |
| Advanced Metallurgy 3 | ||
| Thoth's Metal | 7 Steel, 4 Moon Steel, 4 Sun Steel | Resin:Folded Birch |
| Water Metal | 7 Steel, 4 Moon Steel, 3 Silver | Resin:Pratyeka Tree |
| Advanced Metallurgy 4 | ||
| Metal Blue | 7 Steel, 5 Thoth's Metal, 5 Water Metal, 4 Tungsten | Resin:Cerulean Blue |
| Advanced Metallurgy 5 | ||
| Octec's Alloy | 7 Steel, 5 Thoth's Metal, 5 Water Metal, 4 Tungsten | Resin:Oil Palm |

