The Wiki for Tale 6 is in read-only mode and is available for archival and reference purposes only. Please visit the current Tale 11 Wiki in the meantime.
If you have any issues with this Wiki, please post in #wiki-editing on Discord or contact Brad in-game.
Difference between revisions of "Test of the Oyster Catcher"
| (31 intermediate revisions by 9 users not shown) | |||
| Line 1: | Line 1: | ||
{{Sidebar Test | {{Sidebar Test | ||
| − | | | + | |prefix = Test of the |
| + | |name = Oyster Catcher | ||
|discipline = Body | |discipline = Body | ||
|level = 6 | |level = 6 | ||
|requirements = | |requirements = | ||
| − | |||
| − | |||
| − | |||
| − | |||
| − | |||
| − | |||
| − | |||
|principles = | |principles = | ||
* Go for a swim | * Go for a swim | ||
| Line 17: | Line 11: | ||
* Retrieve three Pearls | * Retrieve three Pearls | ||
* Show your Necklace to the Instructors | * Show your Necklace to the Instructors | ||
| − | |demo name = | + | |demo name = Hakori |
| − | |demo region = | + | |demo region = River Plains |
| − | |demo date = | + | |demo date = 2015-04-20 (Year 10,Peret I-28) |
}} | }} | ||
| + | |||
| + | |||
'''Dive for Oysters, searching for pearls. By fitting the correct color of Pearl to each setting in your necklace, your endurance will increase.''' | '''Dive for Oysters, searching for pearls. By fitting the correct color of Pearl to each setting in your necklace, your endurance will increase.''' | ||
| − | + | ==Demonstration (Completed)== | |
| − | ==Demonstration== | ||
To open the Test of the Oyster Catcher you require: | To open the Test of the Oyster Catcher you require: | ||
| − | |||
| − | |||
| − | |||
| − | |||
| − | |||
| − | |||
| − | |||
| − | + | *1 White Pearl | |
| + | *1 Coral Pearl | ||
| + | *1 Smoke Pearl | ||
| + | *1 Aqua Pearl | ||
| + | *1 Pink Pearl | ||
| + | *1 Beige Pearl | ||
| + | *1 Black Pearl | ||
| − | + | These were found along the shorelines as swimming was not yet possible. | |
| − | |||
| − | + | ---- | |
| − | |||
| − | |||
| − | |||
| − | |||
| − | |||
| − | |||
| − | + | == Overview == | |
| − | == | ||
In the Test of the Oyster Catcher, you are to make a necklace from 14 pearls of varying sizes. Pearls can be obtained by swimming into water, finding a set of bubbles (which represent oysters), and then solving a small puzzle which will "catch" the oyster. Once you have your pearls, you must set them in the correct order to make your necklace. | In the Test of the Oyster Catcher, you are to make a necklace from 14 pearls of varying sizes. Pearls can be obtained by swimming into water, finding a set of bubbles (which represent oysters), and then solving a small puzzle which will "catch" the oyster. Once you have your pearls, you must set them in the correct order to make your necklace. | ||
| Line 71: | Line 57: | ||
== Swimming == | == Swimming == | ||
| − | + | Note that you must learn Swimming separately from signing up for the Test (and of course, is required to participate!) | |
| − | * You enter the water by walking straight up | + | * UBody = Sign up for the Test |
| + | * SBody = Learn swimming (costs 10 Linen) | ||
| + | * You enter the water by walking straight up into it. | ||
* Swimming is done similarly to running in that left-clicking somewhere will swim you there (but right-clicking won't stop you). Terrain steepness is a factor in determining where you can and cannot move. If you're swimming in rivers or lakes, this should not be a big deal. However, this means you can't go too far out into the Red Sea or Mediterranean Sea. | * Swimming is done similarly to running in that left-clicking somewhere will swim you there (but right-clicking won't stop you). Terrain steepness is a factor in determining where you can and cannot move. If you're swimming in rivers or lakes, this should not be a big deal. However, this means you can't go too far out into the Red Sea or Mediterranean Sea. | ||
* To get out of the water, click on dry land, or select the Stop Swimming option from your Special menu. Be careful: it is possible to leave the water in places where you can't get back in. | * To get out of the water, click on dry land, or select the Stop Swimming option from your Special menu. Be careful: it is possible to leave the water in places where you can't get back in. | ||
| Line 83: | Line 71: | ||
[[Image:Fountain_5.jpg|500px|Fountain Detail at highest setting]] | [[Image:Fountain_5.jpg|500px|Fountain Detail at highest setting]] | ||
| − | An oyster bed will be visible from land. However, the visibility range is not that good - only 10-15 coords, and they are | + | An oyster bed will be visible from land. However, the visibility range is not that good - only 10-15 coords, and they are from 5 to 20 coords out from land, meaning you need to be pretty close and right along the shoreline, and sometimes [http://www.atitd.org/wiki/tale6/File:Oyster_View_Range.png In] the water to see them. |
| − | It appears that any given location yields pearls of different sizes, but of the same color. Most colors appear to cluster, with some colors only known to appear in particular regions. See the [[ | + | It appears that any given location yields pearls of different sizes, but of the same color. Most colors appear to cluster, with some colors only known to appear in particular regions. See the [[Maps/OysterBeds]] page for a listing of beds found and colors of pearls retrieved from them. |
Oyster beds are represented by a grid of bubbles that can be of multiple colors (blue, green, white, plus off). Beds that give larger pearls are set on a larger grid and have more colors. | Oyster beds are represented by a grid of bubbles that can be of multiple colors (blue, green, white, plus off). Beds that give larger pearls are set on a larger grid and have more colors. | ||
| Line 108: | Line 96: | ||
=== Pearl Solver Tools === | === Pearl Solver Tools === | ||
| + | * [http://kartal.atitd.org/Pearl_solver/ Online Pearl Solver] - TheMazeEcho's solver hosted on atitd.org. | ||
* [http://www.atitd.org/wiki/tale3/Tests/Test_Of_The_Oyster_Catcher/Catching_Oysters T3 solving guide #1] | * [http://www.atitd.org/wiki/tale3/Tests/Test_Of_The_Oyster_Catcher/Catching_Oysters T3 solving guide #1] | ||
* [http://www.atitd.org/wiki/tale3/Tests/Test_Of_The_Oyster_Catcher/Solutions T3 solving guide #2] | * [http://www.atitd.org/wiki/tale3/Tests/Test_Of_The_Oyster_Catcher/Solutions T3 solving guide #2] | ||
* [http://www.atitd.org/wiki/tale4/images/e/ea/Pearl_solver.zip Pearl Solver] tool from TheMazeEcho (get it from the T4 wiki, as I can't upload zip files to T5 wiki...) | * [http://www.atitd.org/wiki/tale4/images/e/ea/Pearl_solver.zip Pearl Solver] tool from TheMazeEcho (get it from the T4 wiki, as I can't upload zip files to T5 wiki...) | ||
| − | * [http:// | + | * [http://tat2mikki0.tripod.com/ Online Pearl Solver] Tat2mikki's version ''(Does not handle medium beds correctly)'' |
| − | |||
* [http://www.ueda.info.waseda.ac.jp/~n-kato/lightsout/index.html Original Online Lights Out Solver] | * [http://www.ueda.info.waseda.ac.jp/~n-kato/lightsout/index.html Original Online Lights Out Solver] | ||
| Line 130: | Line 118: | ||
If you inserted a pearl in the wrong slot, you can remove it through the test menu. There is a chance of breaking the pearl, with a higher focus giving you a better chance to keep it intact. | If you inserted a pearl in the wrong slot, you can remove it through the test menu. There is a chance of breaking the pearl, with a higher focus giving you a better chance to keep it intact. | ||
* At 0 focus the pearl will ALWAYS break. | * At 0 focus the pearl will ALWAYS break. | ||
| − | * At | + | * At 7 focus, the pearl will break most of the time (85% on a very low sample, 6 out of 7 breaking) |
| − | * | + | * It is unknown what the formula for pearl breaking is, however focus at 75 still resulted in around 10% breakages (3 out of 32 breaking). |
| + | |||
You may remove pearls that are placed in the right slot, but this is probably not something you want to do. | You may remove pearls that are placed in the right slot, but this is probably not something you want to do. | ||
| + | |||
| + | Strategically, given that colors seems roughly indexed to regions, you will save time if you begin inserting pearls as you find them (checking at an SBody or UBody with each insertion, of course). For example, if you get 0 correct colors off a single small white pearl, you can avoid small beds in areas that only produce white pearls. If you get 1 for 1, keep going after them; you don't know how many you need until you hit X for X+1. | ||
| + | |||
| + | You cannot use pearls caught by someone else in your neckless, so once you know a pearl is useless to you, you can remove it, even if it breaks without it affecting your chances at this test. Make a batch of focus food only once you have filled the necklace with right color / wrong location pearls or if you plan on keeping the pearls for the [[Throne of Pharaoh]] or to ground up in a chemistry lab for use in chemistry. | ||
=== Admiring a Pearl === | === Admiring a Pearl === | ||
| Line 140: | Line 133: | ||
== Advancement == | == Advancement == | ||
| − | As you insert pearls into their correct positions, your Endurance attribute will rise. The | + | As you insert pearls into their correct positions, your Endurance attribute will rise. The formula for Endurance gain seems to be: |
| − | + | ||
| − | * | + | :Endurance gain = (3 + 7*(Huge + Large/2 + Medium/4) + Small)/4 |
| − | |||
| − | + | The result is rounded down. | |
| − | |||
| − | |||
| − | |||
| − | |||
Note that you will get a message in the main window saying when you get this endurance increase. This can be used as another indicator that you inserted a pearl in the correct slot. | Note that you will get a message in the main window saying when you get this endurance increase. This can be used as another indicator that you inserted a pearl in the correct slot. | ||
| Line 158: | Line 146: | ||
Please note that this does not refer to your fellow players but rather the scientists at the University of the Body. | Please note that this does not refer to your fellow players but rather the scientists at the University of the Body. | ||
| − | Go to UBody and select Tests. Then select Oyster Catcher and select the option to show the necklace to the instructors. You will come up with a dialogue box showing your progress. This progress chart will tell you which | + | Go to UBody or SBody and select Tests. Then select Oyster Catcher and select the option to show the necklace to the instructors. You will come up with a dialogue box showing your progress. This progress chart will tell you which pearls are the right colour and if they are in the correct setting. |
== Pearl Bed Locations == | == Pearl Bed Locations == | ||
| − | * [[Pearl Bed Locations]] | + | * [[Maps/OysterBeds | Pearl Bed Locations]] |
{{TestsNav|Body}} | {{TestsNav|Body}} | ||
Latest revision as of 12:08, 26 August 2015
| English | Deutsch | français | magyar | Türkçe |
| Test of the | |||
| Oyster Catcher | |||
| Discipline | |||
| Requirements | |||
| |||
| Principles | |||
| |||
| Demonstration | |||
| |||
Dive for Oysters, searching for pearls. By fitting the correct color of Pearl to each setting in your necklace, your endurance will increase.
Demonstration (Completed)
To open the Test of the Oyster Catcher you require:
- 1 White Pearl
- 1 Coral Pearl
- 1 Smoke Pearl
- 1 Aqua Pearl
- 1 Pink Pearl
- 1 Beige Pearl
- 1 Black Pearl
These were found along the shorelines as swimming was not yet possible.
Overview
In the Test of the Oyster Catcher, you are to make a necklace from 14 pearls of varying sizes. Pearls can be obtained by swimming into water, finding a set of bubbles (which represent oysters), and then solving a small puzzle which will "catch" the oyster. Once you have your pearls, you must set them in the correct order to make your necklace.
| Pearl Colors | Pearl Sizes | |
|---|---|---|
|
|
Swimming
Note that you must learn Swimming separately from signing up for the Test (and of course, is required to participate!)
- UBody = Sign up for the Test
- SBody = Learn swimming (costs 10 Linen)
- You enter the water by walking straight up into it.
- Swimming is done similarly to running in that left-clicking somewhere will swim you there (but right-clicking won't stop you). Terrain steepness is a factor in determining where you can and cannot move. If you're swimming in rivers or lakes, this should not be a big deal. However, this means you can't go too far out into the Red Sea or Mediterranean Sea.
- To get out of the water, click on dry land, or select the Stop Swimming option from your Special menu. Be careful: it is possible to leave the water in places where you can't get back in.
- To Dive: RIGHT CLICK on the water where you wish to dive
Finding an Oyster Bed
You must have "Fountain Detail" in your graphics options turned on to see the bubbles (Self >> Options >> Video).
Any setting above minimum will do, though the higher the setting, the brighter the bubbles.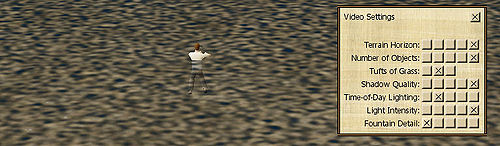
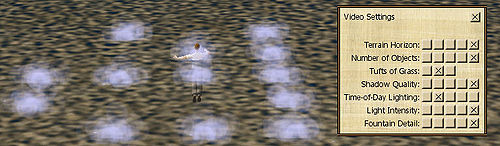


An oyster bed will be visible from land. However, the visibility range is not that good - only 10-15 coords, and they are from 5 to 20 coords out from land, meaning you need to be pretty close and right along the shoreline, and sometimes In the water to see them.
It appears that any given location yields pearls of different sizes, but of the same color. Most colors appear to cluster, with some colors only known to appear in particular regions. See the Maps/OysterBeds page for a listing of beds found and colors of pearls retrieved from them.
Oyster beds are represented by a grid of bubbles that can be of multiple colors (blue, green, white, plus off). Beds that give larger pearls are set on a larger grid and have more colors.
- Small pearls come from 5x5 grids of blue.
- Medium pearls come from 6x6 grids of blue, and in addition, the square you dive on does not toggle.
- Large pearls come from 6x6 grids which appear as blue and green - they toggle through a cycle of blue, green, and off as you dive.
- Huge pearls come from 6x6 grids which appear as blue, green and white.
Oyster beds occasionally appear on top of each other. Once you start diving, all but one of the beds will disappear. In some of these cases, the bed may behave oddly, with some bubbles "staying off" or "staying on" unexpectedly. It is unknown if these circumstances have any other effect. If two appear almost touching, diving in one will make the other disappear.
Solving the Bed
In order to retrieve the pearl from the oyster bed, you must get rid of all the bubbles in the grid. This puzzle is similar to the game Lights Out, in that you are given a grid of bubbles that are either "on" or "off" and you must turn them all off.
Grid spots are toggled by diving.
- For medium size grids, diving on a spot will toggle all the orthogonal spots around it, but not the one where you actually dove.
- For all other size grids, diving on a spot will toggle that spot and all orthogonal spots around it.
- Each spot will cycle through its possible states (off plus each possible color for that grid size) in order as it is toggled.
Once all the spots are off, you will receive a pearl and 7 deben of oyster meat.
A bed will reset if left still for about two minutes. In addition, beds do despawn, so you won't be able to sit at a bed for hours on end trying to solve them.
Pearl Solver Tools
- Online Pearl Solver - TheMazeEcho's solver hosted on atitd.org.
- T3 solving guide #1
- T3 solving guide #2
- Pearl Solver tool from TheMazeEcho (get it from the T4 wiki, as I can't upload zip files to T5 wiki...)
- Online Pearl Solver Tat2mikki's version (Does not handle medium beds correctly)
- Original Online Lights Out Solver
Setting Pearls in the Necklace
In order to pass the test, you need to fit these pearls retrieved together and form a necklace.
A complete necklace will require:
- 7 small pearls
- 4 medium pearls
- 2 large pearls
- 1 huge pearl
There is a numbered slot for each pearl of these sizes (small position 1, small position 2, etc.).
Each slot requires a pearl of a specific color, with the exception of the Huge (which can be any color). You do not know what colors are needed for each pearl initially. How you determine this is by fitting a pearl into the necklace, then showing it off to the instructors at a School or University of Body. They will report to you the number of correct colors and and number of correct positions for each size. (This is similar to the old board game Mastermind.)
If you inserted a pearl in the wrong slot, you can remove it through the test menu. There is a chance of breaking the pearl, with a higher focus giving you a better chance to keep it intact.
- At 0 focus the pearl will ALWAYS break.
- At 7 focus, the pearl will break most of the time (85% on a very low sample, 6 out of 7 breaking)
- It is unknown what the formula for pearl breaking is, however focus at 75 still resulted in around 10% breakages (3 out of 32 breaking).
You may remove pearls that are placed in the right slot, but this is probably not something you want to do.
Strategically, given that colors seems roughly indexed to regions, you will save time if you begin inserting pearls as you find them (checking at an SBody or UBody with each insertion, of course). For example, if you get 0 correct colors off a single small white pearl, you can avoid small beds in areas that only produce white pearls. If you get 1 for 1, keep going after them; you don't know how many you need until you hit X for X+1.
You cannot use pearls caught by someone else in your neckless, so once you know a pearl is useless to you, you can remove it, even if it breaks without it affecting your chances at this test. Make a batch of focus food only once you have filled the necklace with right color / wrong location pearls or if you plan on keeping the pearls for the Throne of Pharaoh or to ground up in a chemistry lab for use in chemistry.
Admiring a Pearl
When you have a pearl in inventory, you can admire it under "Tests->Test of the Oyster Catcher->Admire". You will get a screen showing where the pearl was found and by whom.
When you have more than one pearl of the same color and size in your inventory, attempting to admire any of them will only look at the first one. You have to put the rest down or in a chest and look at them one at a time.
Advancement
As you insert pearls into their correct positions, your Endurance attribute will rise. The formula for Endurance gain seems to be:
- Endurance gain = (3 + 7*(Huge + Large/2 + Medium/4) + Small)/4
The result is rounded down.
Note that you will get a message in the main window saying when you get this endurance increase. This can be used as another indicator that you inserted a pearl in the correct slot.
When you have all 14 pearls correctly inserted, show the necklace to your instructors, and you will pass the test.
Instructors
Please note that this does not refer to your fellow players but rather the scientists at the University of the Body.
Go to UBody or SBody and select Tests. Then select Oyster Catcher and select the option to show the necklace to the instructors. You will come up with a dialogue box showing your progress. This progress chart will tell you which pearls are the right colour and if they are in the correct setting.